
人臉偵測就屬 dlib 函數庫最精準。dlib 使用 C++ 編寫,應用在機器學習、影像處理以及影像辨識等功能。此套件為 Open Source 且 free ,license 基於 BSD 授權條款。安裝 dlib 套件時是下載原始檔,必需經過編譯才能使用。所以在 Windows 需安裝 cmake 及 Visual Studio 2022 c++桌面開發。
2024/09/01 實際測試,dlib 可以在 Python 3.12.6/Cuda 12.6 正常執行,而且在 Windows10 及 ubunt 24.04 皆沒問題。
Windows系統
CMake : https://cmake.org/download/
Cmake 只有 3.24 版本可以正確編譯,3.25/3.26/3.27皆無法編譯出 GPU 版本。請注意 CMake安裝完後 Pycharm 需退出重新執行。
Visual Studio 2019/2022 : 工具/取得工具與功能, 需安裝 使用 C++的桌面開發,注意一定要使用 VS2019 或 VS2022的版本。VS2020 好像無法編譯出 GPU的版本。

Ubuntu
sudo apt-get install cmake python3-pip
安裝套件
dlib 自 19.21.0 版開始,不論在 Windows 或 Linux , 只要有安裝 Cuda/cudnn,直接使用如下指令即可編出支援 GPU 的 Dlib 版本。
pip install dlib --no-cache-dir
測試 GPU
測試是否支援 GPU 的代碼如下
import dlib
print(dlib.DLIB_USE_CUDA)
print(dlib.cuda.get_num_devices())
結果 :
True
1
上述結果如果為 True,表示能啟動 GPU 執行
如果 Cmake 或 VS 版本錯誤,卻又安裝了 dlib,則需先移除 Cmake 及 VS ,改裝正確版本。
然後重裝 dlib 時,又會使用 Python cache 安裝先前 dlib 錯誤版本。所以在 PyCharm 重新安裝 dlib 時,要執行如下指令
pip uninstall dlib
pip install dlib --no-cache-dir
Python程式碼
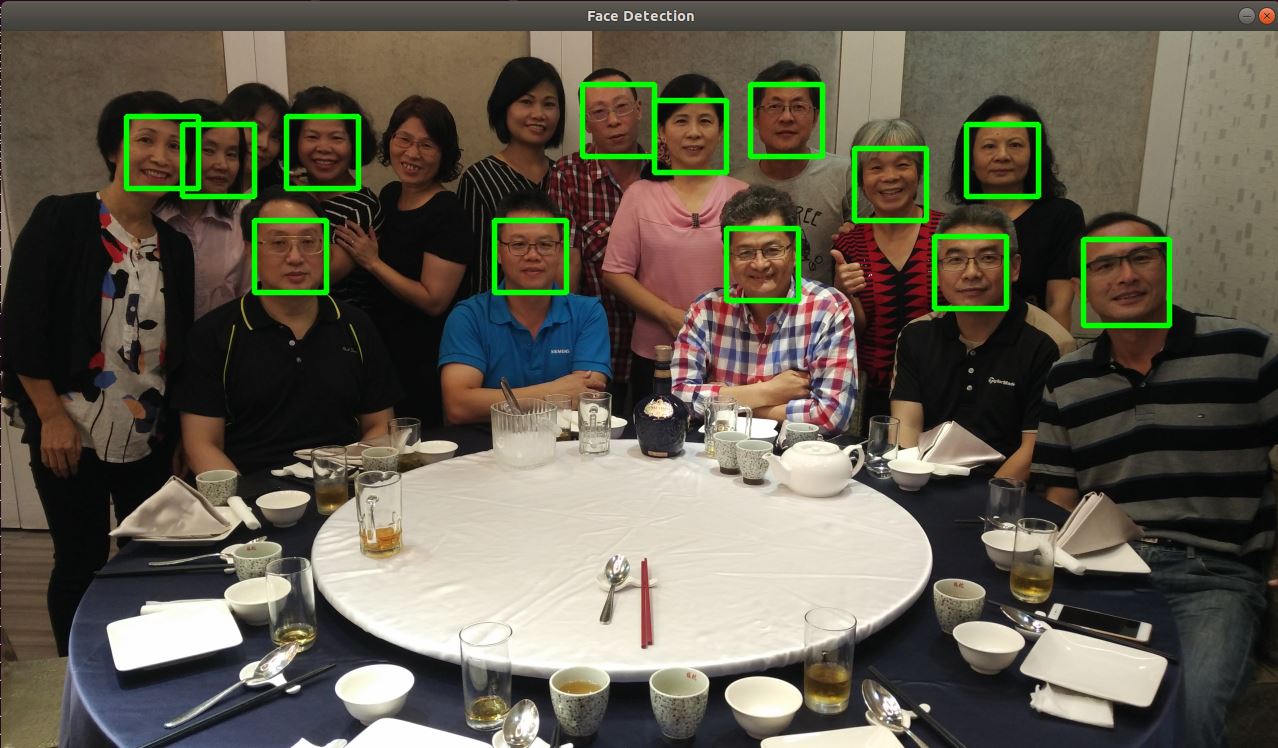
讀取圖片後丟給 dlib.get_frontal_face_detector 人臉偵測器(detector),即會傳回相關人臉的資訊。
detector 函數的第二個參數是指定反取樣 (unsample) 次數,預設值為 0。如果圖片太小,可將其設高一點以提高偵測精準度,當然也較耗時間。
圖檔解析度愈高當然愈精準,但更加耗時。若縮小圖片再偵測,速度較快但較不精準。此時就可以考慮提高反取樣參數。
detector 傳回的人臉資訊為 dlib.rectangle 資料結構, 如
[(256,61) (654,100)]
此結構分別是左上角座標及右下角座標, 可以用 left(), right() 等函數分別取出
import cv2
import dlib
import numpy as np
def resize(src, w=None, h=None, scale=1):
    if w is None or h is None:
        h, w = src.shape[:2]
        w = int(w * scale)
        h = int(h * scale)
    dst = cv2.resize(src, (w, h), interpolation=cv2.INTER_LINEAR)
    return dst
img=cv2.imdecode(np.fromfile('face4.jpg', dtype=np.uint8), cv2.IMREAD_COLOR)
img=resize(img, scale=0.2)
detector = dlib.get_frontal_face_detector()
faces=detector(img, 1)
for f in faces:
    x1=f.left()
    y1=f.top()
    x2=f.right()
    y2=f.bottom()
    img=cv2.rectangle(img, (x1, y1), (x2, y2), (0,255,0), 2, cv2.LINE_AA)
cv2.imshow("Image", img)
cv2.waitKey(0)
cv2.destroyAllWindows()
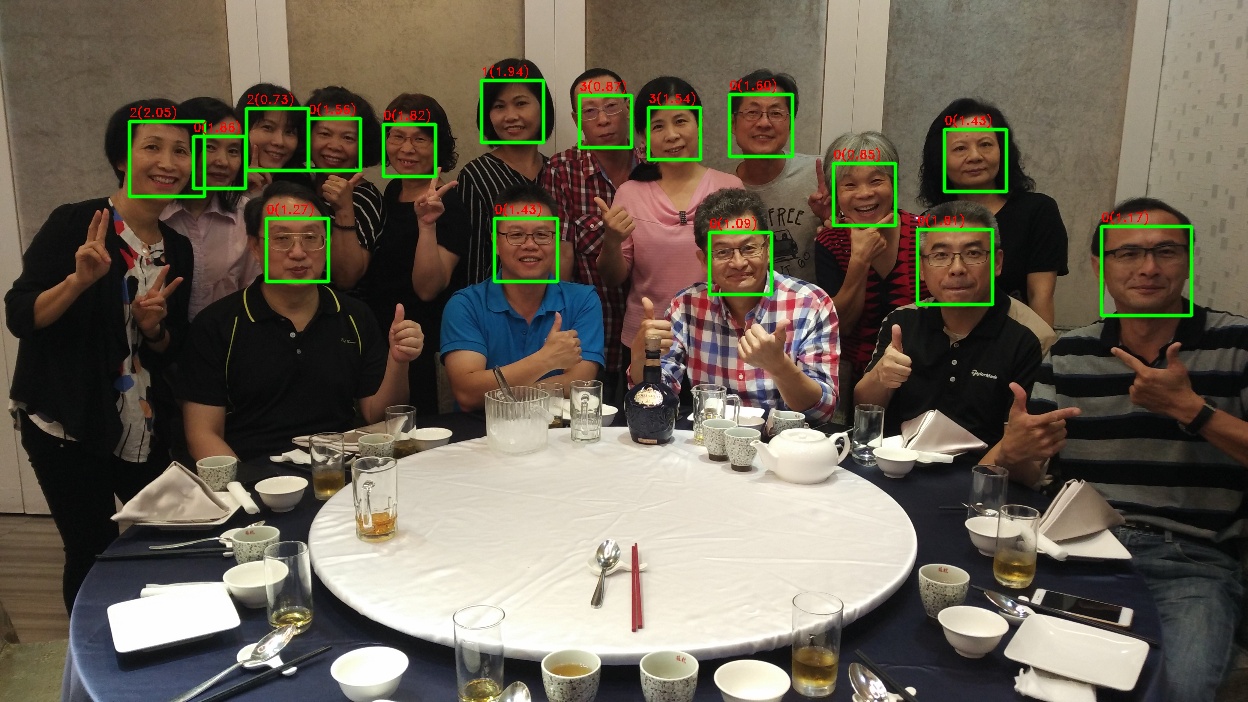
偵測分數
dlib 人臉偵測演算法使用方向梯度直方圖(HOG) 的特徵, 加上線性分類器(linear classifier)、影像金字塔(image pyramid) 與滑動窗格 (sliding window) 計算出來。演算的結果會有一個分數,此分數愈大,表示愈接近人臉。分數愈低表示愈接近誤判。調用 detector.run() 即可取得分數
faces, scores, indexs = detector.run(img, 1, 0.5)
上述第二個參數為反取樣次數,第三個參數為分數的門檻值,要超過 0.5 才會列出。至於返回值 indexs 為子偵測器的編號,用來判斷人臉的方向,詳細說明請看官網
完整代碼如下
import cv2
import dlib
def resize(src, w=None, h=None, scale=1):
    if w is None or h is None:
        h, w = src.shape[:2]
        w = int(w * scale)
        h = int(h * scale)
    dst = cv2.resize(src, (w, h), interpolation=cv2.INTER_LINEAR)
    return dst
img=cv2.imdecode(np.fromfile('face4.jpg', dtype=np.uint8), cv2.IMREAD_COLOR)
img=resize(img, scale=0.3)
detector = dlib.get_frontal_face_detector()
faces, scores, indexs=detector.run(img, 1, 0.5)
print(faces)
print(scores)
print(indexs)
for i, f in enumerate(faces):
    x1=f.left()
    y1=f.top()
    x2=f.right()
    y2=f.bottom()
    img=cv2.rectangle(img, (x1, y1), (x2, y2), (0,255,0), 2, cv2.LINE_AA)
    text = f"{indexs[i]}({scores[i]:2.2f})"
    cv2.putText(img, text, (x1, y1-5), cv2.FONT_HERSHEY_DUPLEX, 0.4, (0, 0, 255), 1,)
cv2.imshow("Image", img)
cv2.waitKey(0)
cv2.destroyAllWindows()
Web Came 人臉偵測 – GPU版
偵測人臉位置的偵測器,使用 dlib.cnn_face_detection_model_v1 卷積神經網路人臉偵測器,此偵測器需載入 mmod_human_face_detector.data 人臉訓練資料。下網址下載 : mmod_human_face_detector.bz2 。下載完後請將 .bz2 檔解壓縮成 .dat 檔
cnn_face_detection_model_v1 比get_frontal_face_detector 更加的精準,且因使用 GPU 運算,就算偵測影片也非常順暢,感覺不到任何延遲,但如果沒有 GPU 的話就論當別論。
import cv2
import dlib
print(dlib.DLIB_USE_CUDA)
print(dlib.cuda.get_num_devices())
cam=cv2.VideoCapture(0)
cam.set(cv2.CAP_PROP_FRAME_WIDTH, 1920)
cam.set(cv2.CAP_PROP_FRAME_HEIGHT, 1080)
#cam.set(cv2.CAP_PROP_POS_MSEC, 900000)
#detector = dlib.get_frontal_face_detector()
detector=dlib.cnn_face_detection_model_v1('mmod_human_face_detector.dat')
while True:
    _,frame=cam.read()
    rate=4
    h, w, _=frame.shape
    x = cv2.resize(
        frame,
        (int(w/rate), int(h/rate)),
        interpolation=cv2.INTER_LINEAR
    )
    faces=detector(x, 1)
    for face in faces:
        f=face.rect
        x1=f.left()*rate
        y1=f.top()*rate
        x2=f.right()*rate
        y2=f.bottom()*rate
        cv2.rectangle(
            frame,
            (x1, y1),
            (x2, y2),
            (0,255,0), 2, cv2.LINE_AA)
    img=cv2.resize(
        frame,
        (1280,720),
        interpolation=cv2.INTER_LINEAR
    )
    cv2.imshow("Face",img)
    key=cv2.waitKey(1)
    if key==ord('q') or key==27:break;
cam.release()
cv2.destroyAllWindows()
