
安裝wordpress 前, 必需先學會 WAMP Server安裝, 無安裝WAMP基礎的人, 請跳過本篇.
安裝MySQL資料庫
安裝wordpress之前,需於MySQL 先建立一個資料庫.請先登入MySQL資料庫, 再新增資料庫
C:\Users\student>mysql -u thomas -p
Enter password: ******
Welcome to the MySQL monitor. Commands end with ; or \g.
Your MySQL connection id is 8
Server version: 8.0.21 MySQL Community Server - GPL

Copyright (c) 2000, 2020, Oracle and/or its affiliates. All rights reserved.

Oracle is a registered trademark of Oracle Corporation and/or its
affiliates. Other names may be trademarks of their respective
owners.

Type 'help;' or '\h' for help. Type '\c' to clear the current input statement.

mysql> create database wordpress;
Query OK, 1 row affected (0.07 sec)

mysql>
下載wordpress及安裝
請於 https://tw.wordpress.org/releases/ 下載最新版本, 將zip檔解開, 將wordpress目錄移到 d:\server\wordpress
再於工作列的wampserver 點選Apache裏的 httpd-vhosts.conf 及httpd.conf修改如下
httpd.conf
ServerName xxx.ddns.net:80
DocumentRoot "c:/server/wordpress"
<Directory "c:/server/wordpress/">
    Options +FollowSymLinks +Multiviews
    AllowOverride all
    Require all granted
</Directory>
httpd-vhosts.conf
<VirtualHost *:80>
    ServerName xxx.ddns.net
    ServerAlias xxx
    DocumentRoot "d:/server/wordpress"
    <Directory "d:/server/wordpress/">
        Options +FollowSymLinks +MultiViews
        AllowOverride All
        Require all granted
    </Directory>
</VirtualHost>
以上設定並儲存後, 右下角之wamp綠色按鈕重新啟動所有服務
網站設定
重啟wampserver 後, 於瀏覽器輸入 http://localhost, 然後依下圖輸入資料. 請注意使用者名稱及密碼為登入localhost MySQL資料庫的帳號及密碼

下個頁面, 設定網站基本資料及管理者登入帳號密碼即可

此時只要輸入 http://localhost 即可看到最原始的網頁了
開啟防火牆
此時遠端不一定能能連進網路, 若防火牆沒有自動開啟Apache http server, 則需手動開啟80 port.
1. 點選控制台/系統及安全性/Windows防火牆/進階設定
2. 點選左邊的輸入規則, 再選右邊的新增規則

3. 選取連接埠再按下一步, 然後選TCP, 特定本機連接埠填入 80
4. 接下去點選允許連線
5. 套用規則中,將三個都勾選 : 網域, 私人, 公用
6. 名稱輸入 : HTTP
設定路由器
上述防火牆開啟後, 發現遠方的朋友還是看不到我們這麼專業的網站, 原來, 被我們的IP分享器給擋了下來. 以下說明, 以Asus的IP分享器作為說明
1. 於Dos模式下輸入 ipconfig, 查詢預設閘道的ip, 然後於瀏覽器輸入, 如 http://192.168.1.1
2. 於外部網站再選取虛擬伺服器

3. 服務名稱輸入 Http Server, 通訊埠算輸入 80, 本地IP則需於Dos 下使用ipconfig進行查詢, 設定好按下 “+” 圖示. 如此遠端的朋友就可以在他們的電腦看到我們的網頁了.

WordPress網址設定
登入wordpress網頁後, 第一個要設定的就是網址的部份了, 請由設定再選一般, 然後將網站的網址輸入, 如下圖. 若無網址, 請進入 no-ip 申請免費網址

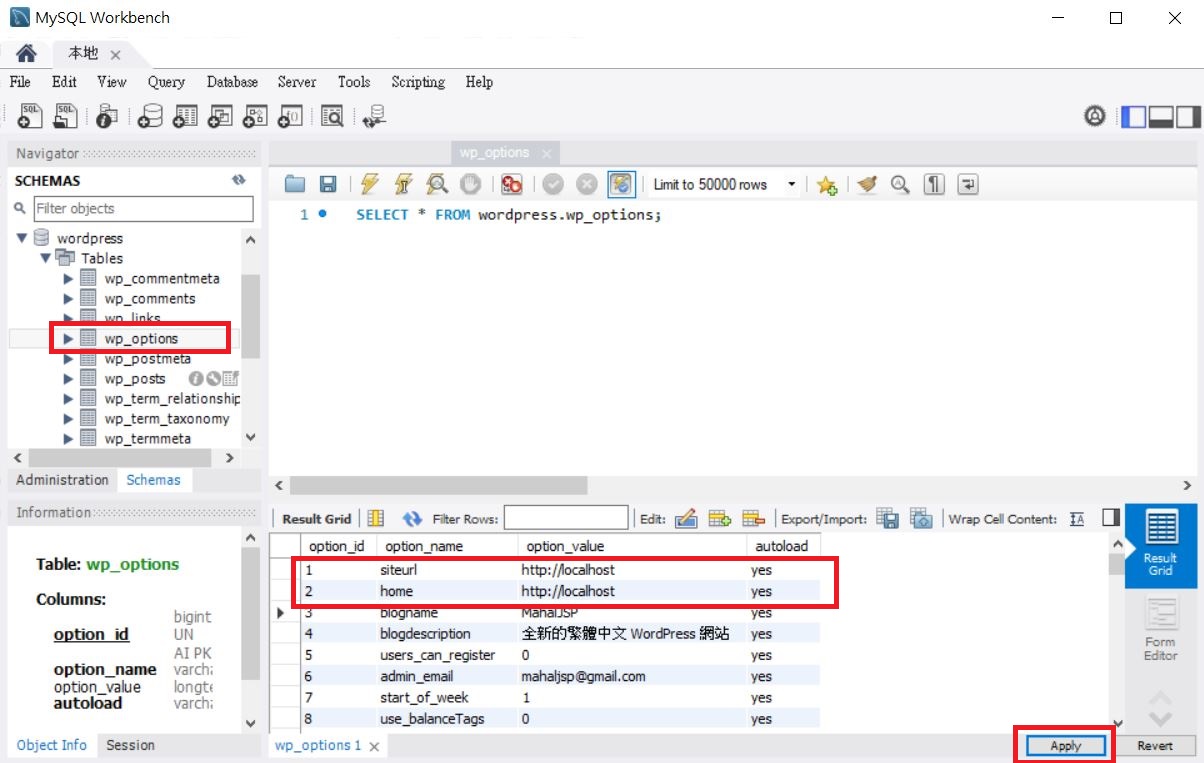
更改網址
上述網址設定好後,有時會因為DNS等因素進不了後台,此時就需進入資料庫手動修改。網址儲存在 wp_options 這個資料表中,打開後更改siteurl及home二個選項,如下圖。
WordPress OOM
WordPress 的選單如果很多的話,會出現 OOM 問題,此時需修改 wordpress 下的 wp-config.php 設定。找到 WP_MEMORY_LIMIT,預設是 256MB,改成 2048MB。
define('WP_MEMORY_LIMIT', '2048MB');
另外在 /etc/php/8.3/fpm/php.ini 底下的 memory_limit 也要加大
memory_limit = 8192M
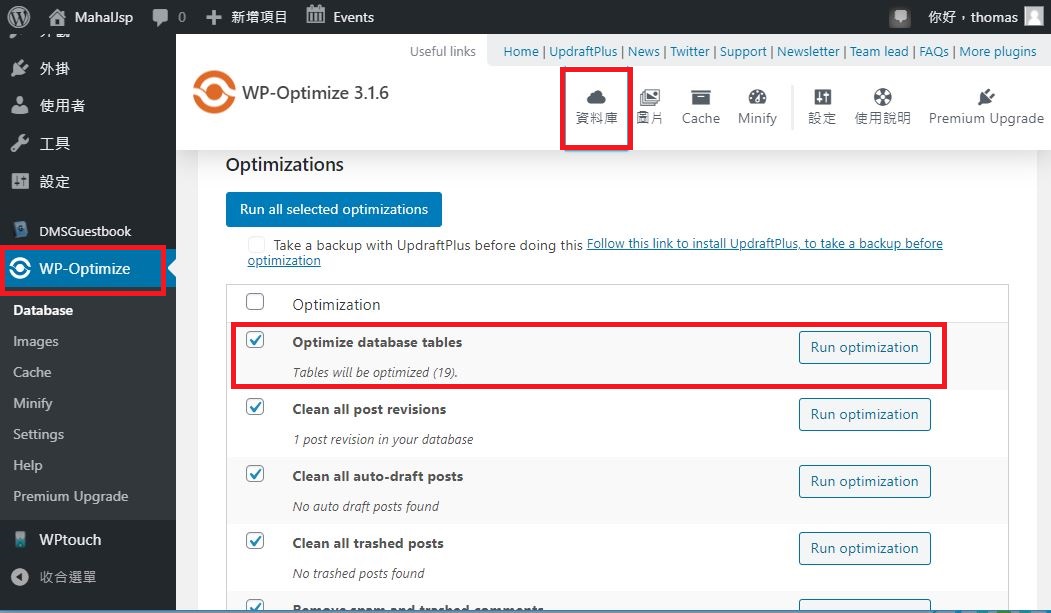
WordPress優化
WordPress使用久了,寫了一大堆文章。然後就會產生許多垃圾。更恐怖的是,每次修改文章,Wordpress都會自動保留修改前的內容,修改後的內容則是以新的資料錄儲存。這種設計是為了讓維護者能回復到前一個版本。但這也讓Wordpress必需花很多時間去計算那一個才是最新的,然後才顯示出來。這時使用者進入網站就會明顯的感覺變的很慢。
此時 WP-Optimize 這個救世主就可以發揮功效了。它可以把那些舊版本的資料庫清除掉,讓網站的效能大大的提升。本人的網站資料庫備份後,有63M,使用WP-Optimize清除後再備份一次,只剩下11M,實在是太神奇了。重點是進入網站後,咻一下,就顯示出來了。
請進入Wordpress後台管理員,安裝外掛 WP-Optimize,然後開啟。選取右上的資料庫,再選取Optimize database tables,Run optimization即可開始清除。
外掛無法更新
有時可能被入侵,導致外系或外掛程式無法更新,可以進入 wp-config.php,把 DISALLOW_FILE_MODS 改成 false,即可更新。
define('DISALLOW_FILE_MODS', false);
關閉 Cache
WP-CACHE 會被 WP-Optimize 由 false 改成 true,造成客戶端無法即時看到更新的內容,所以先把 wp-config.php 裏的 WP-CACHE 改成 false,如下
define('WP-CACHE', false);
然後把這個檔鎖定
sudo chmod 444 ./wp-config.php
當然也可以進入控制台,點選 WP-Optimize,再選取 Cache,把Enable page caching 關閉。
文章頁面上邊界顏色
修改theme的style.css
/**
* 3.0 Basic Structure
* -----------------------------------------------------------------------------
*/
.site {
background-color: #eff;
max-width: 1260px;
position: relative;
}
文章頁面標題顏色
6.2
.site-content .entry-header {
background-color: #eff;
padding: 0 10px 12px;
}
6.3
.site-content .entry-meta {
background-color: #eff;
margin-bottom: 8px;
}
文章頁面主体顏色
6.4
.page-content {
background-color: #eff;
padding: 12px 10px 0;
}
登出時砍掉session
\wp-content\themes\twentyfourteen\functions.php最後增加
add_action('init','session_manager');
function session_manager(){
session_start();
}
add_action('wp_logout', 'session_logout');
function session_logout() {
session_destroy();
}
其他小工具 RSS 和 WordPress 官方網站鏈結移除
\wp-includes\widgets\class-wp-widget-meta.php
<li><a href="<?php echo esc_url( get_bloginfo( 'rss2_url' ) ); ?>"><?php _e('Entries <abbr title="Really Simple Syndication">RSS</abbr>'); ?></a></li>
<li><a href="<?php echo esc_url( get_bloginfo( 'comments_rss2_url' ) ); ?>"><?php _e('Comments <abbr title="Really Simple Syndication">RSS</abbr>'); ?></a></li>
<?php
/**
* Filters the "Powered by WordPress" text in the Meta widget.
*
* @since 3.6.0
*
* @param string $title_text Default title text for the WordPress.org link.
*/
echo apply_filters( 'widget_meta_poweredby', sprintf( '<li><a href="%s" title="%s">%s</a></li>',
esc_url( __( 'https://wordpress.org/' ) ),
esc_attr__( 'Powered by WordPress, state-of-the-art semantic personal publishing platform.' ),
_x( 'WordPress.org', 'meta widget link text' )
) );

wp_meta();
?>
限制上傳檔案及圖片大小
修改php.ini
upload_max_filesize = 16M
post_max_size = 32M
Google 人數統計
header.php 在</head>之前加入
<script>
(function(i,s,o,g,r,a,m){i['GoogleAnalyticsObject']=r;i[r]=i[r]||function(){
(i[r].q=i[r].q||[]).push(arguments)},i[r].l=1*new Date();a=s.createElement(o),
m=s.getElementsByTagName(o)[0];a.async=1;a.src=g;m.parentNode.insertBefore(a,m)
})(window,document,'script','https://www.google-analytics.com/analytics.js','ga');
ga('create', 'Google ID:要申請', 'auto');
ga('send', 'pageview');
</script>
whos.amung.us 網站線上人數統計–彈出式
header.php 在</head>之前加入
<script id="_wau3uh">var _wau = _wau || [];
_wau.push(["tab", "8onxq6g36ta3", "3uh", "right-upper"]);
(function() {var s=document.createElement("script"); s.async=true;
s.src="//widgets.amung.us/tab.js";
document.getElementsByTagName("head")[0].appendChild(s);
})();</script>
whos.amung.us 網站線上人數統計–世界地圖
在首頁加入
<script id="_waufm4">var _wau = _wau || [];
_wau.push(["map", "8onxq6g36ta3", "fm4", "420", "210", "neosat", "target-blue"]);
(function() {var s=document.createElement("script"); s.async=true;
s.src="//widgets.amung.us/map.js";
document.getElementsByTagName("head")[0].appendChild(s);
})();</script>
內文上方padding
style.css更改
@media screen and (min-width: 846px) {
	.content-area,
	.content-sidebar {
		padding-top: 72px;
	}
將padding-top: 改為小一點
內文左邊padding
@media screen and (min-width: 1008px) {
	.search-box-wrapper {
		padding-left: 182px;
	}

	.main-content {
		float: left;
	}

	.site-content {
		margin-right: 29.04761904%;
		margin-left: 182px;
	}
margin-left : 182可以改小一點
2014 theme 整個置中
最外圈為 .site控制
/**
 * 3.0 Basic Structure
 * -----------------------------------------------------------------------------
 */

.site {
	background-color: #eff;
	max-width: 1260px;
	position: relative;
        margin : auto;
}
文章頁面頂部加橫幅
content.php
<style>
.adSenseBanner{
   background-color: #eff;
   width:728px;
   height:90px;
   margin-left : 5%;
}
</style>

<article id="post-<?php the_ID(); ?>" <?php post_class(); ?>>
 <?php twentyfourteen_post_thumbnail(); ?>

   <div id="rightBanner" class="adSenseBanner">
      <script async src="//pagead2.googlesyndication.com/pagead/js/adsbygoogle.js"></script>
      <!-- banner -->
      <ins class="adsbygoogle"
      style="display:inline-block;width:728px;height:90px"
      data-ad-client="ca-pub-xxxxxxxxxxxxxxxxx"
      data-ad-slot="5083196413"></ins>
     <script>
        (adsbygoogle = window.adsbygoogle || []).push({});
     </script>
   </div>

   <header class="entry-header">
首頁加橫幅
page.php
<div id="primary" class="content-area">
<div id="content" class="site-content" role="main">

<div id="adSenseBanner" style="text-align:center;">
   <script async src="//pagead2.googlesyndication.com/pagead/js/adsbygoogle.js"></script>
   <!-- banner -->
   <ins class="adsbygoogle"
   style="display:inline-block;width:728px;height:90px"
   data-ad-client="ca-pub-xxxxxxxxxxxxx"
   data-ad-slot="5083196413"></ins>
   <script>
      (adsbygoogle = window.adsbygoogle || []).push({});
   </script>
</div>
<?php
// Start the Loop.
while ( have_posts() ) : the_post();
ribosome右邊sidebar寬度
sytle.css
右邊sidebar

 .widget-area {
 float: right;
 width: 28%;
 }
28%改為18%

左邊.site-content
 .site-content {
 /* Para Sideba a la derecha
 float: left;
 width: 65.104166667%;
 padding-right: 24px;
 padding-right:1.714285714285714rem;
 border-right: 1px solid #e0e0e0;*/
 /* Para Sidebar a la izquierda */
 float: left;
 /*width: 67.104166667%;*/
 width: 69%;

 67% 改為 75%
手機版廣告
\wp-content\plugins\wptouch\themes\bauhaus\default\single.php
<?php } ?>
<script async src="//pagead2.googlesyndication.com/pagead/js/adsbygoogle.js"></script>
<!-- 回應式 -->
<ins class="adsbygoogle"
 style="display:block"
 data-ad-client="ca-pub-xxxxxxxxxxxxxx"
 data-ad-slot="2301513618"
 data-ad-format="auto"></ins>
<script>
(adsbygoogle = window.adsbygoogle || []).push({});
</script>
            </div>
       </div>
    <?php } ?>
 </div> <!-- content -->
pre自動換行
style.css加入如下
pre {
 font-family: monospace, serif;
 font-size: 15px;
 -webkit-hyphens: none;
 -moz-hyphens: none;
 -ms-hyphens: none;
 hyphens: none;
 line-height: 1.6;
}

pre {
 border: 1px solid rgba(0, 0, 0, 0.1);
 -webkit-box-sizing: border-box;
 -moz-box-sizing: border-box;
 box-sizing: border-box;
 margin-bottom: 24px;
 max-width: 100%;
 overflow: auto;
 padding: 12px;
 white-space: pre;
 white-space: pre-wrap;
 word-wrap: break-word;
}
自動刪除onclick事件
在wordpress 裏撰寫html時, 如果在 button加入onclick屬性, 會被自動刪除.
只要在 wp-content\themes\ribosome\functions.php 裏加入下面代碼即可
function mod_mce($initArray) {
	$initArray['verify_html'] = false;
	return $initArray;
}
add_filter('tiny_mce_before_init', 'mod_mce');
選單小寫設定
更改wordpress目錄下 wp-content/themes/ribosome/style.css
請注意, ribosome為本人使用的佈景主題, 請依個人的設定選擇不同的主題
然後將 .main-navigation 的 text-transform註解掉即可
.main-navigation li a{
    border-botton:0;
    color:#6A6A6A;
    line-height: 3.692307692;
    /*text-transform: uppercase;*/
    white-space: nowrap;
}
Linux 上所需套件
在 Linux 上,wordpress 需底下幾個套件,請先安裝一下
sudo apt-get install php-imagick php-mbstring php-xml php-curl php-intl php-zip