
在網頁內顯示外部 html 網頁,使用 <iframe> 即可解決。顯示圖片使 <img src=”圖片檔案”/> 也很簡單。但如下問題必需考慮到效能問題。
- 由 Python 產生的 html ,如何從記憶体中 render 到模板?
- 由 Python 處理後的圖片,如何從記憶体中 render 到模板。
一般的解決方式是將 html、圖片儲存到硬碟,再由 Django 網頁的 html 連結到硬碟檔案,這種方法透過硬碟儲存會大幅降低效能。
正確的作法是將記憶中的資料直接丟給 Django。
Plotly Html
使用 plotly-express、plotly 產生的 html 如何在 Django 網頁顯示呢,比如下圖所示。
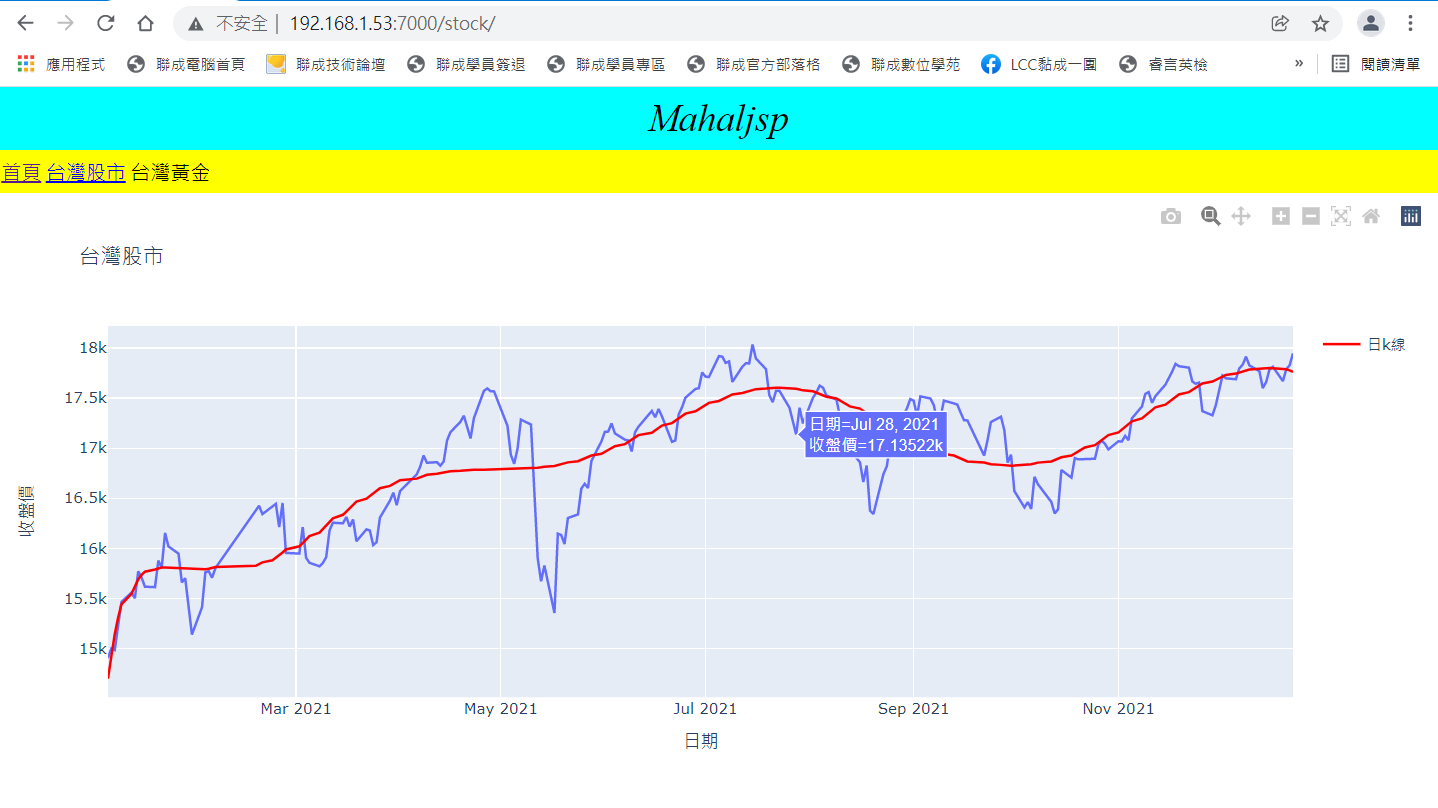
stock.py
如下的 python 代碼中,利用 fig.to_html() 產生 html 字串,直接傳給模板,這樣的效能會比把 html 儲存到硬碟還要好。
模板再使用 iframe 的 srcdoc 引入 html 字串即可顯示。
import pandas as pd
from django.shortcuts import render
import mysql.connector as mysql
import plotly_express as px
import plotly
import plotly.graph_objects as go
import numpy as np
def html(request):
    conn=mysql.connect(host='ip', user='帳號', password='密碼', database='資料庫')
    cursor=conn.cursor()
    cmd="select * from taiex where tx_date>='2021-01-01' order by tx_date"
    cursor.execute(cmd)
    rs=cursor.fetchall()
    cursor.close()
    conn.close()
    ls=[]
    for r in rs:
        ls.append(r)
    cols=['id', '日期','openning','highest','lowest','收盤價']
    df=pd.DataFrame(ls, columns=cols)
    fig=go.Figure()
    fig.add_trace(go.Scatter(x=df['日期'], y=df['收盤價'], name='收盤價', line = dict(color='blue', width=2), showlegend=False))
    x=list(range(len(rs)))
    f=np.poly1d(np.polyfit(x, df['收盤價'], 10))
    reg=f(x)
    fig.add_trace(go.Scatter(x=df['日期'], y=reg,name='日k線', line=dict(color='red', width=2)))
    data=fig.to_html(include_plotlyjs='cdn')
    return render(request, 'stock.html', {'data':data})
stock.html
{% include "head.html" %}
<style>
    //底下的div用不到,只是註記而以
    div{
        background-color:#aaaaff;
        height:100%;
        width:100%;
        text-align:center;
        margin: 0;
        display: flex;
        justify-content: center;
        align-items: center;
    }

    iframe{
        width:100%;
        height:100%;
        border:0px solid black;
    }
</style>
<iframe srcdoc="{{data}}">
</iframe>
{% include "tail.html" %}
圖片內崁
假設由檔案取得 A 圖片,經過處理過為 B 圖片,那 B 圖片如何顯示於網頁中呢? 有如下二種方式
- 將 B 圖片儲存到硬碟,再由 html 超連結硬碟路徑。
- 將 B 圖片直接丟給 Django。
第二種方式的效能當然會比第一種好,原因是第二種方式是在記憶体中直接轉換。
Python 處理
Python 的代碼如下
import base64

from django.http import HttpResponse
from django.shortcuts import render
import cv2
import numpy as np
def html(request):
    #開檔轉 base64 utf-8 字串
    #with open("tiger.jpg", "rb") as f:
    #    img_base64=base64.b64encode(f.read()).decode("utf-8")

    #開檔
    img=cv2.imdecode(np.fromfile("dog.jpg", dtype=np.uint8), cv2.IMREAD_COLOR)
    #處理
        #pass
    #編碼轉 base64 utf-8 字串
    img_str=cv2.imencode(".jpg", img)[1].tostring()
    img_base64=base64.b64encode(img_str).decode('utf-8')

    return render(
        request,
        "picture.html",
        {"img":img_base64}
    )
上述先把 numpy 的 img 轉成 base64 utf8 字串,再傳給模板。
html 模板
模板 html 檔案需在 img 的 scr 加入「data:image/jpeg:base64, 圖片base64字串」。
{% extends 'base.html'%}
{% block content1 %}
<div>
<img style="width:800;height:auto;" src="data:image/jpeg;base64,{{img}}" >
</div>
{% endblock %}